Monday, February 18, 2019

Two More Vehicles and Small Progress

With a visit to Columbia to have ice cream with a granddaughter, a stop at New Brookland Model Train and Hobby Shop was a must. 

Since the granddaughters are lobbying for a small church and I've purchased the Clever Bros Small Rural Church kit, I need to make some progress on that front.  How's a purchase of some Woodland Scenics figures?  Found a preacher in the graveside funeral set and a couple of folks dressed for church in the people on the move set.  Might be hard to find a spot for the church; running out of room.

But, there's always room for a couple of vehicles.  The cops and robber set from Woodland Scenics donated a sheriff's car at Ebenezer Grill and a green 1940-ish coupe for the Cotton Factory parking lot:


Wednesday, January 2, 2019

Layout Improvements

Well, the mechanical remote turnout controls installed in 2015 were working pretty well for the siding but not for the mainline to branch turnouts.  The two, far turnouts were connected so they could be operated together.  That seemed to create too much resistance when the control rod was pushed in.  Instead of activating the turnout, the outer tube bent and took up the "slack".  I had tried using "eye screws" to hold the tube straighter, but that didn't help.  So, now a ~1/2" PVC tube has been installed to keep the outer tube from bending.

Of course, the eye screws were just a bit too small for the PVC, so each one was removed and the eye spread a bit.  The first length cut of the PVC was too long, of course -- but thankfully it was not too short!  A quick removal, cut, and replacement solved that issue and the whole gizmo seems to have done the trick.  We'll see how long it lasts before something else comes up.  If it works, it will make operating the layout a lot easier.  The backdrop has made reaching the turnouts more difficult.

Photo may not show what's up but this is the installed solution from an under-the-layout view:


Another problem had been that the layout was collecting dust in the workshop.  So, I chose a sheet of plastic that had wrapped a new mattress and then been used as a drop-clothe for painting.  With a couple of ~18" supports at two corners and the backdrop, the sheet could be stretched over the layout and thumb-tacked in place.  That kept the dust from continuing to collect, but I was noticing little black flecks on the layout in somewhat random locations.  It finally occurred to me that the bottom side of the plastic (drop-clothe) sheet had black paint sprayed on it.  This paint was coming off in little flakes!

Memory of another plastic sheet came into focus, so this piece was retrieved from the lean-to and rinsed off to remove some of the dirt and dust collected from almost being outside for several years.  As I was spreading it over the pick-em-up truck to dry, it became evident that this piece of plastic might cover the whole chassis of the Olds 442!  And, it did. . . .

Plan B:  turn the drop-clothe plastic over with the over-spray on top.  We'll see how that works.  Note the square area that shows where the black paint is NOT!

Friday, December 7, 2018

DCC Upgrade

The Southern F3 A/B units were not working as desired.  The B unit still had an old decoder in it.  The A unit just didn't like to run on the less-than-perfectly-clean track.  I had tried to install a keep alive capacitor, but that didn't seem to help a lot.  So, I broke down and purchased TWO new decoders and two Current Keepers by Soundtraxx.  By the way, George at Soundtraxx provides outstanding tech support.  He recommended the Tsunami2 PNP decoders and commented that the Current Keepers just plug directly into these decoders -- no soldering needed.

Here are a few shots along the way, starting with the A unit.  The old decoder fit on a "peg" that I removed in hopes of making room for the new decoder, larger speaker, and Current Keeper.  Got everything wired up and attempted to reassemble.
Wires cut loose and two-sided tape in place.  Peg removed.

Speaker I had modified earlier (with baffle).  Used CA glue to put it together and tried it in the loco.
Body would not fit back on chassis, so removed the cab interior and rearranged Current Keeper and speaker.
Everything fit and it was ready for a test run.  Dang, the headlight didn't work.  Pulled the body off again and checked light bulb with a 1.5 AA battery.  Still no light.  Read the directions to find out that the connection used was for 12 V bulb.  Ooops.  Moved the positive connection to the side of the decoder where a 1.5 V positive was provided.  Fortunately, a couple of extra 1.5 V bulbs were in the "spares" box!  That setup worked fine, including running around the whole layout without hesitation.

Fortunately, the B unit didn't have a headlight to worry about nor a cab interior.  Had to made a couple of wire cuts from this situation (and need to photo the finish product; later).

When installation was completed, the B unit ran fine by itself.  Parked the B unit on a siding while operating the A unit for a few more spins around the layout.  While doing that, I thought I heard the B unit talking to me!!  Come to find out, the PNP decoders have several audio recordings of locomotive activities for "Fireman Ed". . . including radio conversations, door closing, lubrication, and wrench dropping among other sounds.  Will need to turn that off as well as bell and horn for B unit.

Really is a bit overkill to have an A/B setup on the layout since it's so small, but it will be fun to try to program a "consist".

The speakers installed on these locos are very loud in comparison to the small speaker on the SW1 switcher.  But, the volume can be adjusted.  That's the next project -- adjust the volume, turn off Ed, bell, and horn for the B unit and maybe try to run the two units together.

I still say these decoders are remarkable.  Over 40 possible horn sounds.  I don't need but one!  A number of bells.  The problem is, which one is prototypical.  More research.

As promised, here's the B unit with connections completed.  

Thursday, September 20, 2018

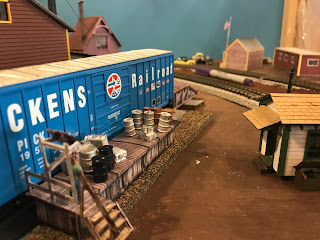
Ramp and Dock for Team Track

Probably felt a bit guilty using a laser kit and not using a Clever Bros cardstock "kit" for the team track office, so I chipped in the $20 for the Clever Bros Jackson Volume 3 "CD" download.  That got me a ramp, a dock, and some stairs to use; plus a few other kits.

Modified the loading ramp somewhat to ensure that a flatcar would fit and the coupler would not interfere.  That required lengthening the ramp a bit.  The "extension" seemed a little precarious sticking out in the infinite, so added a couple of 4X4/6X6 supports.  They turned out to be too short, so I fabbed up a couple of (tan) concrete foundations, about 18" in diameter.


The sign on the side of the team track office says, "Office, Trade Street Team Track".  Trade Street ran along the Southern Railway tracks in Rock Hill -- don't know if there was a team track; still checking on that.

To make sure the other folks in Rock Hill who needed "less than car load" would be serviced, I also constructed the loading dock.  Again, I tried to extend it a bit and somehow the underpinning and the dock, itself, ended up being different lengths.  So, added stairs and shelter.  That worked out OK, I suppose.


We'll need to do a little painting of the off-loaded goods and decide what type to focus on.  But that ought to allow for a pretty busy team track, as long as the Cotton Factory shipments don't get in the way!

Another challenge will be to raise the surrounding ground level to that of the track bed.  Shouldn't be too big a hurdle. . . .

A Team Track

Don't know why, but I decided to add a "team track" scene to the layout.  The best place was at the Cotton Factory siding where the Armory needed a means of receiving jeeps, trucks, and such.  When I found a BTX laser cut Southern Railway Team Track Office, I just had to try it out.  Another small structure "perfect" for the small layout.  Realizing, of course, that sharing an industry siding with a team track is probably not so prototypical. . . .

Started by painting many of the parts before removing from the "board".

Assembly went pretty smoothly -- the accuracy for laser cutting is amazing!


Used a little florist styrofoam to help fill up the coal bin and topped off with a bit of HO scale "coal".

The fascia for the roof did not fit the slot very well after painting the pieces.  I had used a needle drill to open holes for the small front roof supports, and that worked well.  Probably should have used the same approach for the fascia board.

Will probably leave the roof unfastened from the office

Got a pot-bellied stove from Rusty Stumps and desk/file cabinet from Model Tech Studios.  Would have been easier to install before putting up the rafters!  But since I had left the door and window open, I went "all the way".  Even have a mug to go on top of the stove since I couldn't find a coffee pot.  Don't know about Southern Railway employee, yet, but I have included a box for him/her to sit on (not in picture).

Thursday, August 23, 2018

Plantings at Station

Checked on the ground goop from granddaughter's visit and just had to add some vegetation around the train station!

Started with a mix of fine turf from some earlier work.  Painted some half-and-half white glue in an area around the station and across the track leaving room for car parking, bus, and REA Express truck. . . maybe.  Found the fan I was using for cooling was blowing the turf all over the place so turned the fan off and found some turf that may not have been glued down too well.

That led to using an ear syringe bulb to add some half-and-half, but got way too much.  So, pulled out the 2mm static grass and the homemade static applicator.  Figured this could be a planting area and the rest could be the grassy lawn.

Used some commercial flower hedge and a few commercial flower bunches in the area.  Then went to another of the spindly trees.  Wrapped the tree with florist tape a la Farm Pond about VI.  Then painted some "Fawn" acrylic to soften the brown tape and camouflage the gray wires.  Sprayed the tree with strong hold hair spray and dusted on some coarse turf.  Sprayed again and dusted on some earth tone blended turf.  Not sure that helped a lot, but it felt better.

Poked a hole with a scratch awl and glued the tree in place with white glue, full strength.

Photos along the way:


Before and after:


Another view:

Wednesday, August 22, 2018

More Ground Goop

Without the participation from a couple of granddaughters -- and the request from the "other" family to let a granddaughter visit for a couple of days -- took the opportunity to offer Ground Goop mixing to my 6-year-old granddaughter.  Knowing that her older cousins had done the same was probably enough to raise sufficient interest.

So, with the usual recipe of vermiculite, celluclay, paint, and white glue, we started mixing up a batch.

Spent a few minutes taping the track near the site of ground goop addition, but couldn't take the time to photograph.  Had hoped to cover the area right at the  "front" side of the layout, around the station, and between the outer and inner loops from the middle of the layout around the station corner.

Had some concern that the station on the layout might have been too extravagant for Rock Hill, SC, but turns out the actual station was pretty significant:

So, decided to leave the extended platform.  Marked off the location of the station and platform so we wouldn't cover with ground goop.

Now everything was ready.  Got a good start before granddaughter lost interest -- covered everything we had taped off!


After granddaughter lost interest, finished around the station end and added some ground goop between the inner and outer loop all the way around the other end.

The color is a bit dark, but will be covered with ground cover, field grass, flocking, etc. Pretty good progress for a 6-year-old.
Replaced the station and platform before the goop dried completely.  No problem.
Well, actually, there were several spots on the floor and side of layout that received some brown paint.  Sooner or later maybe we'll paint the sides. . . .