Monday, January 29, 2018

Farm Pond II -- Digging the Hole

Some of the steps in construction of a farmpond are probably NOT going to be too exciting for the granddaughters, so I went ahead and tried a few things to "lower" the pond into the layout.

After drilling a hole to get things started, I inserted the saber saw blade into the hole, and got a good ways around the outline before running into other objects:

Next effort was to use a single blade hacksaw, but that didn't work too well -- for one thing, it wasn't going to make the turn sharp enough:

I had looked for a keyhole saw I thought I had before stealing the hacksaw from The Wife's tool box in the house.  So, I looked again in the workshop when her saw didn't work, to no avail.  Even checked Home Depot and they didn't have a keyhole saw, but they did have a cutter for the Dremel tool.  That finished the job:

Used a belt sander and a rat-tailed file to round over the "bank" of the pond-to-be a little.  At the top edge, the bank is to be trampled down a bit from the horse going to water there.  Hard to tell from photo except for sanding dust on re-railer!

The plywood is 1/2", so I looked for something more like 3/8" to lower the pond bottom and secure from underneath the layout.

Most guys that have used two-part epoxy for "water" warn of sealing all leaks, so I used some left-over clear caulking. . . probably a little more than I needed.  Is has a 7-14 day fully cured time, so I'm on hold for a while.  Here's hoping that's enough caulking so it doesn't leak, AND the caulking doesn't get dissolved by the epoxy.

Saturday, January 27, 2018

Testing Static Grass Applicator

Finally pulled out a couple of AA batteries to "charge" the static applicator and decided on a test area on the layout.  There's a bit of a knoll on the far side of the layout that could use a little scenicking.  Until now, I wasn't sure what to do with it.  This is the spot, between the edge of layout and tracks; this is looking from the rear of the layout, tobacco farm on the right in this view.


To the left (from the front) is the tobacco farm and to the right is the blacktop highway itself and part of town.  So, here's the plan:

  • Start off near the tobacco farm with a hint of a pasture that will be seen in the backdrop, mostly.  
  • The pasture, of course, needs some static grass, but also probably a fence.
  • Just past the pasture and fence line, moving toward town, will be a wooded area.
  • And then some of the knoll will be left for maybe an elevated city building of some sort.
Started with a bunch of material for the grassy part of the knoll:  green ground foam, earth foam mixture, 0.5 mm static grass, flower patches, 50% water/white glue, full strength white glue.


Painted some diluted white glue on part of the knoll and sprinkled a bit of green ground foam, followed by earth foam mixture.

Added diluted glue to cover the pasture area and then tried out the static grass applicator.  Frankly, I was very satisfied.


Used a few sprigs of orange and red flowers to add some variety.

Next was to try for the small patch of woods.  Materials included:  dediduous trees from two different packages, blended turf, some bushes, some lichen and florist "weeds", more diluted glue and white glue, DIY forest floor leaves and debris, and some heavy duty hair spray.

Again, brushed on some diluted glue and sprinkled a small amount of blended turf to start the forest floor.  Added DIY forest floor leaves and debris plus a few pieces of florist "weeds" with full strength white glue.  Used a scratch awl to poke holes for the trees.  But the trees right "out of the box" looked a bit too green, so spritzed the trees with the hair spray and sprinkled blended turf on them.  That gave a bit more of an early fall look.  Placed the trees in position by gluing with white glue in each hole.  A couple of small bushes didn't seem to bring the woods up to snuff, so a couple of lichen clumps were glued on with white glue.  The woods are beginning to look OK!  This shot is from the front and the woods are in the rear.  The tree to the far left of the clump looks like it's separated; that's because there's a gully between it and the next tree.  We'll put some epoxy water on it with a little puddle at track level when we pour the farmpond.

Thursday, January 25, 2018

Farm Pond -- Design and Zapper

Made a trip to Boone, NC, with two granddaughters and parents.  While older granddaughter, dad, great uncle, and granddad took a short hike on the Appalachian Trail in VA, younger granddaughter joined mother and great aunt to local Ashe County attractions -- cheese factory, 50-cent Cheerwine machines, museum, etc.  Check out previous post about Ashe County Museum -- VERY nice HO train layout.  The AT group returned worn out, chilly, and pleased; the Ashe County group came home wanting a "water feature" on the Blacktop Crossing!

Plans so far are to create a farmpond between the cotton field and the cotton gin.  Not a lot of room, but enough, we hope.  Proposed scene would be something like this:
Oops, photo should be rotated 90 degrees clockwise!

Got into a sequential vortex of sorts:  farmpond to be surrounded by horse pasture, horse pasture to contain shed (already constructed), horse shed needs a few bales of hay, DIY hay bale calls for short static grass glued to piece of balsa wood, there will be plenty of static grass left over, maybe can use it somewhere else on layout, but need static grass applicator, so here comes DIY applicator.

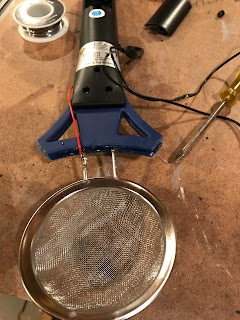
Lots of folks on Internet seem to like using bug zapper for DIY applicator, and brag about less than $10 expense.  Ordered zapper and picked up strainer at Ollie's -- cost must be less than $5!!  Pieces:


 Alligator patch cord, solder, hot glue already available.  Haven't tried out applicator to date!!

Outlined pond on plywood by poking scratch awl through paper drawing.  Not sure yet how to make clean cut to allow lowering pond AND sealing sufficiently to use epoxy "water".
Most supplies are on hand:  ground goop ingredients, toothpicks for fence post, 1 mil copper wire to try to use for fence line, a few Woodlands Scenic trees (obtained at discount at Hobby Lobby), a couple of young boys fishing, epoxy water, etc.  Just waiting on next visit from granddaughters, although hope to have pond "lowered" by then.