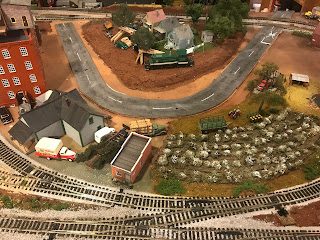
Since the Clever Bros Rural Church was a bit larger than I had anticipated, a little extra "earth" was needed to make room.
Used pink foam insulation to get some earth going:
Just glued it down with white glue and tried to contour a bit mostly with a welding wire brush.
Found some Sculptamold in Charleston while visiting with The Wife for a granddaughter's ballet and stopped into an art store. Everybody seems to rave about it. Tried to used same dark brown paint as used with "ground goop" but color turned out a bit lighter.
No problem; needs to be covered with ground foam and/or static grass, anyway. Added some "local" boulders just because I could. . . .
More room for church, now, but still looks a bit large!
Have not added the Clever Bros foundation, yet. With the cardstock foundation or maybe one of "local" boulders, the church will be leveled up somewhat. Will have to call that progress!
Thursday, May 30, 2019
Sunday, May 19, 2019
Fauna of Blacktop Crossing
Well, not only do we get suggestions from the grandchildren, but even the children, too!
Recently, the trail camera caught a new resident of our "prototype" neighborhood:
So, now the child (who is the mother of three) decides that the Blacktop Crossing should also have a new arrival. Sorry about the size of the spots; they seemed a bit large so a few more small spots were added using a straight pin for application of white paint.
Scenery still needs some work on the forest floor, but the fawn will be available when completed.
Recently, the trail camera caught a new resident of our "prototype" neighborhood:
Scenery still needs some work on the forest floor, but the fawn will be available when completed.
Saturday, May 18, 2019
"Little" Church
Well, the granddaughters suggested any small, Southern town needed a little, wooden church -- a church of some sort, anyway. So, Clever Bros just came out with a Rural Church that would seem to fit the bill.
Took the weekend visit to in-laws in Lakeland to put the cardstock kit together. I must admit two things:
1. The church is a bit larger than anticipated
2. The construction leaves a bit to be desired! Couldn't seem to keep everything square. . . .
From a distance and with the preacher carrying on in front, it looks like what's needed. Still wondering about windows on the front of the church -- maybe a small one on each side, somewhat high on the wall, like maybe there are steps going up to balcony seating.
Some scenery work will be needed to fit the church into the mill village. The blacktop road can be seen in the background. With it somewhat permanently installed, it allows some encroachment that might give the church a little better foundation. Some work will be required.
Tuesday, May 7, 2019
Blacktop Highway
So, if it's a Blacktop Crossing, it must have a blacktop highway. The asphalt shingles have been cut for quite some time, but just recently some "weathering" and "elevating" has been completed.
Tried diluting medium gray paint to produce a wash to age the roadway. That didn't look too good, so just used full strength with some dry brushing to distribute over the road but leave a darker center on each lane. That was a bit better:
Wash on right, full strength with dry brushing on left.
Then used a Sharpee to add some tar strips and white paint to add center line. A 1948 federal traffic signage brochure suggested 15 feed of white stripe with 25 feet between stripes.
Sort of free-handed the railroad crossing warning. Not the best, but cheap!
Added two layers of cork to give the roadway some elevation and maybe allow for a ditch along the road. Glued it all to layout. Used handy nut and bolt containers to weight down overnight.
Will probably connect dashes on curve to make a solid line there. Will need to do a little more work where the pieces join together -- after glue dries a bit.
Subscribe to:
Comments (Atom)


