Monday, March 5, 2012

A Wooded Slope

We needed a source of wood for our pulpwood trucks, and a "scene" of some sort to fill one more corner of the layout, so how 'bout a wooded slope?  The lay of the land is not mountainous, but a little hill here and there will keep it from being totally "table-top"!  This is not intended to be a "how-to" post, but just steps taken to provide another perspective for some common scenicky processes.

Early on, two pieces of 1/4" birch plywood were cut in a rough, "hilly" form for the far right corner.  In fact, they can be seen in an earlier post with the pulpwood truck.  Following that, ~1" wide strips of cardboard were cut and woven into a hillside.  Hot glue was the primary adhesive, but staples were used in a couple of places, especially when a strip needed to be cut in the middle to adjust its length:


Then dryer sheets ("exhausted"?!) were dipped in Hydrocal and draped over the woven hillside.  The sheets were "laid up" first to see how they would fit -- AND the rails were coverd with masking tape and newspaper for protection.  Although several methods with Hydrocal recommended using gloves to keep from drying out your hands, that didn't seem to be a problem. . . .


A darker "dirt" paint was used to cover the Hydrocal and would be used to mix for "ground" later.
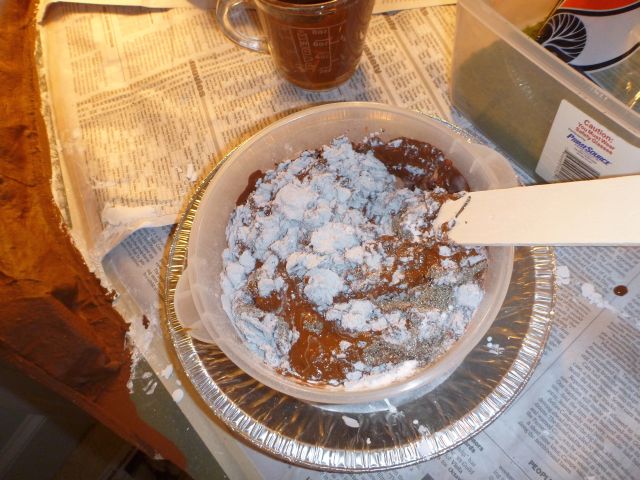
Lou Sassi's "ground goop" recipe (see, for example, Kalmbach's "Basic Scenery for Model Railroaders") was followed to cover the hillside and give a bit of texture to the slope.  This is roughly the recipe used:  one cup each of vermiculite, Celluclay, and paint; and one-half cup of white glue.  If you decide to use the Lysol, you pour in one cap full.  I forgot the Lysol although I had it ready to go.  This seemed to be a combination of playing with mud and frosting a cake!  The texture was not real strong, maybe too much frosting and not enough mud. . . .


Next was an application of varied fine ground foam; at least a couple of different "shades".  Since this is a hillside with trees (at some point), having a bit of the ground showing through seemed to be appropriate.  The ground foam was adhered with extra hold hair spray applied after the foam.

We're looking forward to some undergrowth, the Southern Yellow Pines, and maybe a little Kudzu growing up the bank!

Tuesday, February 28, 2012

The Horse and Wagon

It has been a month since a cotton wagon was mentioned, so here's the (almost) finished product.  The wagon is a Jordan Products, Highway Miniatures "Old Farm Wagon".  My version is modeled after a wagon I found on the Internet at:
http://outlawshideout.blogspot.com/2009/10/its-cotton-picking-time-down-south-or.html
Seems this might be at some sort of museum or display; isn't that a plaque of some sort on the side?  It also seems evident that this is not "live action" since there are no horses/mules hitched to the wagon!

I also "stole" from a professional modeling group -- at least their horse colors of dapple gray and a sort of buckskin.  Check this out:
http://www.cmrtrain.com/cmr-train-aiken.html
This is a layout in Aiken, SC; you need to scroll down a bit to find the horses and wagon.  Their wagon is loaded with bales of cotton whereas the wagon on Blacktop Crossing will be filled with raw cotton (I'm still looking for something to model raw cotton!).

Here is the wagon before and after:


OK, looks like a reasonable facsimile!  The wagon is painted tomato red with yellow wheels (pretty obvious) and flat black rims.  Added sides came from scale 1X4" lumber for horizontal boards and left-over 2X4" from the Corydon Country Store (used before).  Used an Early American stain before gluing together.  Reins are brown thread; they work OK, but are a little stiff.  The traces are felt laces that have been sliced, but they are still a bit too thick.  Jordan Products suggested using masking tape painted brown.

Some really SMALL parts gave me fits on the model.  In fact, one of the handrails on the buckboard popped out of my tweezers and was never to be found.  I had to use some "flashing" from a cast metal model to fabricate another handrail.

The harness still needs something between the tongue and the horses, and, of course, there's no cotton in the wagon.  BUT, is that a tractor and trailer behind the wagon?

Another model, the GHQ's Ford 8N Tractor, gave another mode of transport of cotton to the gin.  I've always wanted a little Ford tractor, so this might be it.  Although it came with a plow and a scraper, I left them off to allow the trailer of cotton to be towed.  The wagon is a Busch Gmbh with the hay removed:
Here is before and after!


The wagon needs some work -- at least some "stakeside" addition.  I was a bit disappointed in that it looks too large for HO.  But, maybe it will work.

Fortunately, the tractor came with two steering wheels (they can be seen in the "before" photo).  I used one for the Deuce Coupe -- again, lost when popped out of tweezers!
After I went to all that trouble to "make" a steering column for the tractor steering wheel to be used on the Deuce Coupe, I discovered that other models -- specifically, a Mack truck that I'm working on -- do not even have steering wheels!?!?

Tuesday, January 31, 2012

Pulpwood Truck

We had one extra spur without a specific industry (the far right-hand spur inside the ovals) on the layout.  The first thought was to use a junk yard idea from a recent "Model Railroading".  That looked like it would be fun, even though it would not say "Southeast" like cotton does.  On further reflection, a pulpwood yard came to mind.  I already had a pulpwood rack from my childhood, so we picked up another rack, and thought about other details.

The 50's in the Southeast saw lots of "bobtail" pulpwood trucks on their way to the pulpmill or wood yard.  So, that seemed like a good detail.  This is what I was aiming for (note the Southern Railway rack, more later):
See this link by Louis the "Desertdrover":
Also, this site includes instructions for building a pulpwood truck.  I took his lead!

Instead of Louis's International Harvestor truck, I used another 41/46 Chevy (like the cotton truck, MiniMetals) but this time it was a tandem axle and was intended to be used as a tractor-trailer rig.  Pulling the fifth wheel was not too tough and that left two, straight rails from the frame.  I used a scale 6 inches of 3/32" styrene tubing for the tubes to hold the vertical logs at the rear of the truck.  That's about an 8-inch tube, which is certainly on the large side, but it seemed to look OK.  Used the same tubing for the front verticals, but drilled the tubes out a little with a 1/16" bit to make the walls thinner on the tops of the tubes.  The tubes are a scale 8-feet long/tall.  Added a roughly 3-foot cross-pipe at 6 feet up the front tube.  All that was glued on with CA cement after getting a coat of flat black acrylic paint.

The fun was trying to figure out what to use for pulpwood.  The linked article (above) suggested left-over Christmas tree/wreath.  However, I felt his load of pulpwood had too much bark and was too big in diameter.  I found another site with a 2007 L&N Magazine containing an article about L&N's pulpwood racks from the 50's by Bob Chapman.  This article listed L&N's total racks at 926, but Southern Railway had the most of any line at 3264.  I felt justified in choosing a woodyard for our Southern layout!  Chapman suggested that commercially available racks by Atlas have logs that are too big -- 9 to 27" in diameter.  So, I was hoping to get more toward the 4 to 12" variety with less bark to wood.  I walked out to the back yard and found some small pine twigs -- but they were pretty "barky".  A dead oak branch looked promising and two other hardwood varieties were selected.

I cut one length to about 5 feet, scale, and used it to cut the others.  At first, I kept all four varieties separate:
Notice the two longer sticks (v-shaped) for the rear supports.  After I thought I had a sufficiency, I started the process of gluing things together.  I used white glue for the pulpwood and tried to include small and large logs throughout the load.
Since I didn't like the looks of the pine "sticks" and wasn't too pleased with the looks of one of the unknown species, I soon found that I was combining the remaining two piles of wood as I went.  My father, a woodlands and wood procurement manager for several pulp mills, would probably not be pleased with this load of "mixed hardwoods"!?!  I finished  with a slightly rounded top and THEN checked to see what the maximum highway height was -- 13.5 to 14.5 feet is what I found on the Internet.  I estimated this load to be about 12.3 feet, so I'm good.  However, it would not surprise me for pulpwooders to get every stick on their truck they could! 
I'm debating whether to use cable/chain to hold the load on.  I'm pretty sure something was used. . . .

Louis (link, above) added mudflaps.  That's a nice touch, and maybe another addition.  Pulpwood trucks are more in need of weathering than cotton stakeside trucks.  These trucks spent time in the woods and suffered from a good bit of mis-use and abuse.  Again, I just cannot bring myself to weathering, yet!

I also need to find a loader for the trains -- a large fork lift or a crane of some sort with a sling would fit.  Another Clever Brothers structure, the yard shed, will probably be used for this spur.  What else?

Stakeside Cotton Truck

I finished up a cotton truck (almost) yesterday.  I ordered a 41/46 Chevy flatbed, MiniMetals brand, in hopes of being able to convert it to a stakeside-type truck.  Actually, the flatbed worked out pretty well.

I used some left-over "lumber" from the Coryden Company Store I had made earlier.  Had to slice a few "4X4's" with this setup:
The horizontal boards came from scale 1X4's that I picked up from a train store in Tampa, FL, the 2nd largest train store in the US!  The first two 1X4's I glued to the 4X4's were farther apart than I had planned, but I just left them that way and matched the others to them:

I only had early American and walnut stain pens to use, so I chose walnut.  Since the flatbed was rather light, it got a few coats of stain, too.  It's pretty evident where I got some extra white glue on the boards:
Still not sure exactly WHAT to use for raw cotton.  For photos, the converted flatbed and a Woodland Scenics pick-up were "loaded" with cotton from commercial cotton balls.  The pick-up was the Henry's Haulin with the acetylene tanks, barrels, and sacks removed.  The "gear" will find itself at the Company Store sooner or later.  All items popped out of the pick-up easily, except one; it finally came loose.  Here are the two trucks of cotton lined up to be weighed and emptied at the Cotton Gin.
Looks like I'll need to add some screen or "fence" to the stakeside to keep the cotton in, or have the cotton wrapped in burlap.  In due time, a horse and wagon with cotton will be added.  Oh, and the truck still needs the outside rearview mirror and maybe some weathering.  Hate to weather a nice, new truck but this is supposed to be about 1956, so the truck is at least 10 years old. . . .


Wednesday, January 25, 2012

Seven Pines

Earlier I had made three "Southern Pine Trees" using the bottle brush method.  The intent is to place a small hill on the back, right corner of the layout with a pine "forest" on it.  Well, three trees does not a forest make, it seems.  SO, back to the bottle brushes to make a few more.

I took the same approach as before (see the earlier post on Southern Pines) with a couple of exceptions.

First, I only applied the coarse ground foam after spraying the "brush" with brown paint.  I did not use the hair spray for a second coating of fine ground foam.  I felt the first batch had too much "foliage" for a pine tree.  My backyard ("prototype") tree was much "airier" -- you could see lots of sky through the branches and needles.

I used the same method to "turn" 1/4" square balsa dowels into tree trunks:  I chucked each one into my drill and ran them gently against a sheet of relatively coarse (maybe 60 grit) sandpaper.  I applied light pressure with my fingers behind the paper.  The last dowel was too weak to use the drill; it kept breaking off at the chuck.  So, I pulled out my Dremel tool with a sanding drum and worked on that dowel until it was close to being round.  The gouges that the sanding drum caused caught me attention.  I went back to the other "trunks" for the day and applied the drum to them in various places.  This gave the trunks a more natural look, in my opinion.

For the "dead limbs" on these pines, I used dried flowers (Natural Dried Caspia) that I had picked up from Michael's.  For the first group, I had used reindeer moss, but those limbs turned out to be rather hairy and green!  By picking through the dried flowers, I was able to cut out some pieces that looked more like naked branches.  Then I used some of the gray with brown paint that I had used for the trunks to paint the dead branches.  I even went back to the trees with reindeer moss and painted their dead limbs.

A couple of these trees are approaching 100' tall.  That's within the range for full-grown Southern Pines, but I may decide to shorten them.  My wife said the trees look "strong" -- I think she's being polite instead of saying "too tall"!?!?!

I'll need to fabricate the hill before I forest it, but here are the trees, first group of three (with the hairy dead limbs) and second group of four.  With a little undgrowth here and there, I think that's enough for the forest!

Tuesday, January 24, 2012

A Double-Crossing -- Sort Of

With encouragement from the good folks on the “Model Railroader” forum, I pursued adding a return crossover from the inner oval to the outer oval of the Blacktop Crossing layout.  Originally, I thought of using a double crossover.  I wasn’t sure I had enough room otherwise, and for some reason the double crossover just looked like a neat approach.  Input from the forum suggested that the crossover might be expensive, and then all the talk about electrical continuity raised my concern.  A couple of posts suggested just using a return crossover.

So, a return crossover, it was.  There was a little room on the back, left side of the layout; maybe enough for a crossover.  I wanted to use #6 turnouts as we had done on the first crossover.  My thought being, operationally, that the occasional passenger train on Blacktop Crossing could make a loop or two around the outside, then around the inside for a change of venue, then back again.  I liked the lower angle of the #6 – even though the inside loop does have 18” radius track.  Oh well, it was a thought.

I ran into only a couple of issues.  One was that two ties on the straight track between the turnouts overlapped with turnout ties.  Only one turnout gave me that problem, and I had not seen it on the first crossover.  No big deal; just cut those ties close to the rail.  Another issue was the distance between the last 18” curved track and the first spur track turnout.  That required cutting an inch or so off of the inside turnout.  Another, “no big deal.”

I used a fairly long straight section between turnouts – maybe a 9” plus another 1 ½” section.  I replaced two 9” straight sections plus a short piece or two with the second turnout and some flextrack on the outside track.  As luck would have it, one of the rail connectors was also an electrical junction; and the new turnout put the junction right in the middle of its straight section.  Fortunately, it was a "common" junction, so I just moved it into the next curved section.  Of course, I needed an insulated connector between the turnouts.  None could be found in my "inventory", so a special trip to the hobby shop was in order.  Between the two ovals, I decided to just “ballast” the whole thing; I think I had seen that on another layout and that seemed easier than figuring what to do between two roadbeds!

When all was said and done, I pushed a couple of cars over the new crossing and then ran a locomotive pulling a few cars including a passenger car.  With just a little modification (mostly tacking down the track), everything ran fine.  I found myself trying to get track very straight, but then recalled seeing the “real thing” with twists and bends everywhere.  I wondered if I didn’t need to take a sledge hammer to our layout!  The "S-bend" worried me a little, but loco and cars navigated everything smoothly.  We do need to install a tie here or there, and ballast the WHOLE layout.  But, as it is, see what you think:


Friday, January 13, 2012

The Southern Yellow Pine -- Bottle Brush Style

The Blacktop Crossing layout seemed to need a little more of something to give it the truly Southern theme and locale.  What's more Southern than a Yellow Pine forest?  So, since the far, right-hand corner needed some scenicking, I thought a little knoll with a few pines would be just the thing. . . .

Hoping to make the trees myself, I reviewed several websites, YouTube videos, and such about making conifers via the "bottle brush" method.  Most of them, however, leaned toward spruces, cedars, and other conifers that had the typical "Christmas Tree" shape.  Of course, Southern Yellow Pines don't!  An example from my back yard:
While the top approaches a conical form, the bottom 2/3 is nothing but trunk.  Other prototypes are even less symmetrical!  But, what the heck, the bottle brush method looked like fun, so I gave it a try.

The materials I used, in most cases because it was what I had on hand, were:
Green florist wire, 20 gauge, 18" long
Sisal rope, ~1/4" diameter because is was what I had on hand
Masking tape, 1/2"
Leather brown Krylon satin spray paint (not latex, but what I had in garage)
Woodland Scenics fine turf, burnt grass
Woodland Scenics coarse turf, medium green
Tresemme' extra firm pump hairspray
Elmer's white glue
Clothespins with hole in the "handles" to hang on. . .
Cut clothes hanger for drying
1/4" square Balsa sticks
60-grit sandpaper
Fairly coarse "artsy" paintbrush
Acrylic, "artsy" paints -- bark brown, pewter grey, black
Florist moss from dollar store.

I doubled the florist wire to make about 9" long; cut about 4" lengths of rope, unwound, and combed.  My first try I used about a 4-5" length of masking tape that I spread some 4" sisalettes (stole this term from Chris on Model Railroad Hobbyist Magazine website) along the tape.  After placing the masking tape with sisalettes between the doubled wire, I hooked the looped end of the wire around a bird feeder shepherd's crook and chucked the other end in a variable speed drill motor.  When I turned the drill on (slow speed), the bottle brush was formed.  It looked OK, but the tape seemed to "push" the sisalettes into more of a spiral than I wanted.

So, for the next tree, I tried putting white glue on one leg of the doubled wire and placing the sisalettes on it.  The glue mostley dripped off of the wire, so for the third tree I just placed the sisalettes between the legs and let the "spring" of the doubled wire hold them in place.  That worked about as well as any, as long as I kept the sisalettes horizontal or supported them lightly as I turned the drill on.

With the three bottle brushes complete, I sprayed each one with leather brown paint -- including the "trunk" -- and dusted on the coarse foam while the paint was wet.  Then I sprayed with hair spray and dusted on the fine turf.  Frankly, I liked the coarse foam by itself.  I think I used too many sisalettes for Southern Pines and by the time I had added the fine turf, the foliage was VERY thick!?!  It's a little hard to see, but the far right tree only has the coarse foam.  [By the way, the picture is upside down since I was hanging the trees to dry on the cut coat hanger.]
Since the foliage in only on the top 1/4 to 1/3 of a Southern Pine, I had to make trunks.  For this, I used the 1/4" square Balsa dowels.  I drilled a hole, maybe 2" deep, to fit the twisted wire into one end of each dowel.  I hand-sanded the first one round, but chucked the other two into my drill and sanded them as they rotated in the drill.  Using fairly rough sandpaper, 60 grit, the trunks had a LITTLE bit of character.  I painted the first dowel with bark brown and tried to highlight by "dry brushing" with black.  For the other two, I used a blob of bark brown next to a blob of pewter grey on a styrofoam paper plate as a palette -- picked up a little of each color on my brush.  After painting all three, I think the greyish ones are a LOT closer to the actual color of my backyard Pine!

I added a few, small (!) pieces of floral moss to the trunks by first wallowing out a small hole with a #11 Xacto blade then putting a little white glue in the hole.  I had to hold the "dead limb" in place for just a few seconds before it would stand on its own.  I cut each bottle brush off to remove the loop at the top and to leave about 2" of twisted wire at the bottom.  Then, I used white glue as I inserted the twisted wire into the trunk.  Finally, I did a little trimming of the foliage.

The final results are not quite what I was hoping -- the foliage is too dense, the trunks are too straight (although a LOT of Pines have almost perfectly straight trunks), and the dead limbs are a bit off-color.  But, that's a good start for my stand of Southern Yellow Pines!  Some folks would say, "Just use these away from the front of your layout."  Problem is, the layout is too small to get very far away.  I like the two on the left OK, the one on the right needs a new "do".  I plan to make another handful or so and use fewer sisalettes. . . .